Posts

Showing posts from 2014

Use Chrome for Development and Allow Cross-domain Javascript and AJAX

Image
Use Another Instance of Chrome while Retrieving Content or Data from an Ajax Source on a Different Domain If you are developing an application and calling a data source from another domain, you may encounter trouble when trying to use AJAX to retrieve a JSON data source from a service API for instance. You may see an error message like the following: Chrome XMLHttpRequest cannot load [THE_URL_ENDPOINT].  No 'Access-Control-Allow-Origin' header is present on the requested resource. Origin 'http://localhost:8080' is therefore not allowed access. - OR - IE SEC7118: XMLHttpRequest for [THE_URL_ENDPOINT] required Cross Origin Resource Sharing (CORS).  SEC7119: XMLHttpRequest for [THE_URL_ENDPOINT] required CORS preflight.  SEC7120: Origin http://localhost:8080 not found in Access-Control-Allow-Origin header.  SCRIPT7002: XMLHttpRequest: Network Error 0x80070005, Access is denied. There are many solu...

Disabled Save Button on Forms while Saving in Salesforce

Image
How to Disable the Save Button on your Form while the Form is Saving to Prevent Multiple Submissions in a Custom Salesforce Visualforce Page Salesforce default functionality on forms will disable the save button after the form is submitted to prevent multiple submissions. The disabled Save button will look like: Disabled save button after form submit When creating your own VisualForce page you can write custom code to mimic this functionality in your forms using just Javascript and modifying the button's CSS styles. Create Javascript functions to disable and enable the save button You will need to create 2 Javascript functions that will enable and disable the button by modifying the css and properties of the save button. I am using jQuery but you can also do this with vanilla Javascript. I am currently using a unique style class attached to the button to look it up for convenience since this page does not get modified very often if eve...

Setup Service Rocket Connector for Salesforce.com and JIRA

Image
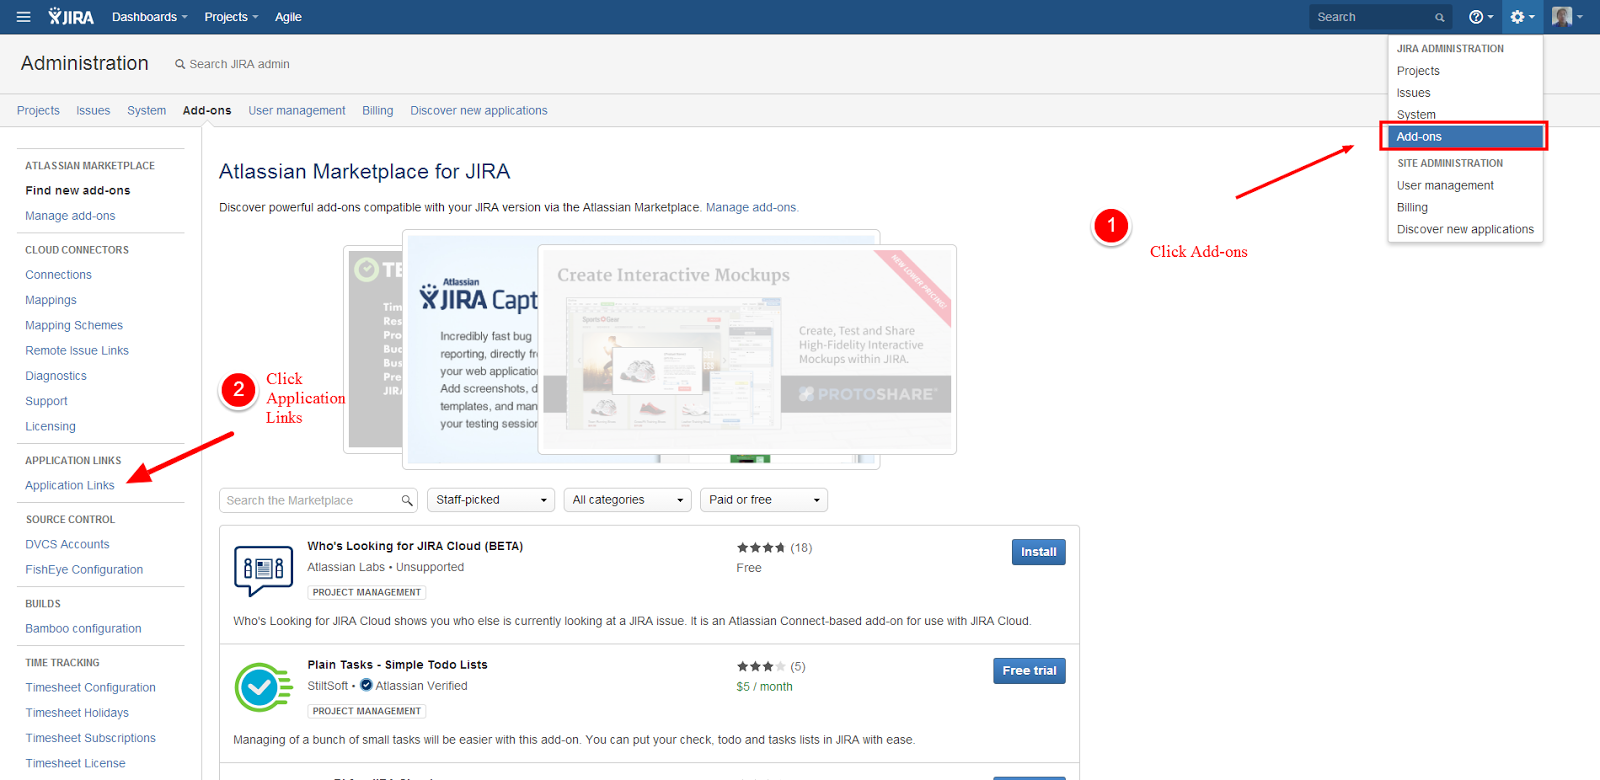
Setup Service Rocket Connector for Salesforce.com and JIRA Are you looking into integrating Salesforce and JIRA? The following product comes pre-installed on Cloud On-Demand JIRA instances. Service Rocket Connector for Salesforce.com and JIRA The ServiceRocket Connector for Salesforce.com and JIRA links and synchronizes Salesforce.com cases and JIRA issues for an integrated experience from either interface. Add your Application Link to JIRA for your Salesforce instance First you need to go into your Add-ons section and navigate to the add a application link for your Salesforce instance: Add application link Add your salesforce domain: Add application link Get your SEN Number You will need your SEN number to setup the plugin. Finding the JIRA Support Entitlement Number (SEN) Acquire a Connector License You will need to acquire a license for the Salesforce JIRA connector.  Navigate to the following link to acquire a license ...

Create a Salesforce User in Apex with all Required Fields Populated

Create a Salesforce User with Code in Apex with all of the Required Fields Populated for a Test Class When attempting to create a user with code in Apex you will encounter an error if you do not populate every single required field. You may be attempting to do this for a Test class or for any number of reasons. The error you encounter may look similar to the following: Missing fields Exception System.DmlException: Insert failed. First exception on row 0; first error: REQUIRED_FIELD_MISSING, Required fields are missing: [LastName, Email, Alias, TimeZoneSidKey, LocaleSidKey, EmailEncodingKey, ProfileId, LanguageLocaleKey]: [LastName, Email, Alias, TimeZoneSidKey, LocaleSidKey, EmailEncodingKey, ProfileId, LanguageLocaleKey] Create a User Many of those fields require specific values populated from a picklist. Below is some boilerplate code you can use to create a use programmatically with all of those fields populated correctly. You can use your own values for...

Salesforce Combobox Autocomplete in IE8 using jQuery

Image
Creating a Combobox Autocomplete Input Field Compatible with Internet Explorer 8+ using jQuery Issues with Built-in Combobox functionality in Visualforce If you try to use the off-the-shelf apex tag to using a inputText field to create a combobox by passing in a list of comma-separated values you will get a nasty surprise when you try to open the page in Internet Explorer. Even though IE is officially supported, it will not display correctly. Apex Default Combobox Tag <apex:inputtext list="{!getAccounts}" value="{!accountName}"></apex:inputtext> A great way to get around this limitation is to use the jQuery combo box. The jQuery combo box is not a standard widget and will not be packed into the jQuery UI by default, but you can configure it with a reasonable amount of code. You will need the following libs: jQuery javascript library - jQuery jQuery UI javascript library - jQuery UI Avoid conflicts wit...

Tips for Migrating from Eclipse to IntelliJ - Re-learning shortcuts and other Tips

Image
Migrating from Eclipse to IntelliJ:  Re-learning shortcuts and other Tips As a long-time Eclipse user(Spring Tools Suite and Groovy and Grails Tools Suite), the transition to using IntelliJ was jarring in many ways.  Keyboard shortcuts are different, the layout is different and the way you do things is different. It is worth it to go through with the transition.  Auto-complete and searching is better.  Logs and consoles are better.  The tooling is better.  There are plenty of articles out there that highlight the changes.  Most importantly though is that it is does everything you need well and is very fast. Here are some things that will help with your transition: How to Change the JDK Setup the JDK locations Here you will want to setup the location of the Java SDKs you have installed. Ctrl+Shift+Alt+S -> Platform Settings -> SDKs:  Change JDK Update the JDK in the IntelliJ IDE Setup the Project SDK T...

Salesforce Dynamically Populated List of Checkboxes in Visualforce and Apex

Image
Dynamically Populated List of Checkboxes in Visualforce and Apex Below you will find details on how to create a dynamic checkbox group on a custom Salesforce page using Apex and Visualforce. These examples will leverage Visualforce specific tags and Apex specific functionality to accomplish things that you would normally need an external library such as jQuery to acheive. Dynamic Array of Checkboxes Dynamically build an array of checkboxes and keep track of which boxes are checked.  Checkboxes will be populated from a SOQL query from a custom object in Salesforce.  Selected options will be tracked and persisted if you re-render the checkboxes. Visualforce Command button to refresh list of checkboxes <apex:commandButton action="{!refresh}" reRender="customCheckboxPanel" status="loadingDetails"> This is just an example.  A more practical use of this would be a onchange or onclick event such as if you had checkbo...

Viewing DEBUG statements in Salesforce APEX Files using the Browser Developer's Console

Image
How to view System Debug Statements in the Salesforce Dev Console Use system debug statements in your Apex code to log the info you need. system.debug('results ' + results); Open up the page and execute the behavior you are trying to monitor using system debug statements. Choose the Logs tab at the bottom of the console and double-click the most recent log for the page you are monitoring. i.e. apex/yourpage Select the Logs tab and open your log file Once the log is open you can either check the "DEBUG ONLY" checkbox or check the "Filter" checkbox and filter on the string "USER_DEBUG" or any custom string you are searching for specifically.  Both options are at the bottom of the console. Set the Filter to only display items containing "USER_DEBUG" Viewing logs in the browser in your Salesforce Instance If you are having trouble opening the logs in the Developer Console you can open the logs in...

Getting Started with Apex Development on the Salesforce Force.com Platform using the Force.com IDE

Image
Getting Started with Apex Development on the Salesforce Force.com Platform using the Force.com IDE Below I will describe the steps to getting started using the SFDC plugin in Eclipse to start developing custom Apex classes and Visualforce pages for Salesforce.  This guide does not focus on configuration or "click" based development. You may prefer to use the built-in developer console instead of the Eclipse IDE. Download and Install the Eclipse IDE Latest version of Eclipse as of 4/25/2014:   Eclipse Standard 4.3.2 for Windows 64 bit Download Page:   http://www.eclipse.org/downloads/ Install the Force.com Plugin for Eclipse From the top menu, Click  Help > Install New Software Install the Force.com Plugin Click  Add Under the  Add Repository  message Set the  Name  to "Force.com IDE" and  Set  the Location  to " http://media.developerforce.com/force-ide/eclipse42 " then ...