Posts

Showing posts from 2015

Whirlwind Tour of JavaOne and Oracle Openworld 2015

JavaOne 2015 Roundups and Summary Articles I recently had the wonderful opportunity of attending JavaOne and Oracle Openworld 2015 and have extensively blogged about the social and technical aspects of the conference! Get a taste of the many events and exhibits on display and an insider's view on the conference.  I will also be presenting the most important takeaways regarding the future direction of Java including an in-depth discussion of changes coming in Java 9 and how to best prepare for those upcoming changes. If you are local to the Richmond,VA then check out our meetup on the topic! http://www.meetup.com/Richmond-Java-Users-Group/events/225877596/ JavaOne 2015 Day 1 Roundup #JavaOne Day 1 roundup: https://t.co/1UpcvxZuIz - Keynote, Welcome event, #jdk9 #java 10/11 previews #JavaOne2015 pic.twitter.com/NynOszVTuf — Ippon USA (@IpponUSA) October 26, 2015 JavaOne 2015 Day 2 Roundup #JavaOne Day 2 roundup: Focus on #JDK9 and project #ji

Running a new jHipster Application using Compass and the main CSS file is not loading

Image
How to fix a Newly Created jHipster Application not Loading the Main CSS File  If you see an error similar to the following upon first startup of a jHipster application you have just created: Failed to load resource: the server responded with a status of 404 (Not Found) http://127.0.0.1:8080/assets/styles/main.css jHipster with CSS not loaded Then you will need to run the grunt task, grunt compass. Install Compass You will need to first install Compass, an open-source CSS Authoring Framework before you can run the Grunt task to create the main.css file which is missing. Using node: npm install compass Reference the following link for more info about installing compass using npm https://www.npmjs.com/package/compass Run Grunt Task After you install Compass, you will then need to run the grunt task.  In in IntelliJ you can click the grunt task runner at the bottom of your screen or go to Tools -> Open Grunt Console. Run grunt compass task

Spring Scheduler to Create Background Process to make Async Calls to Update Cache in Spring Boot

Image
Using Spring Scheduler to Create a Scheduled Task that hits your Endpoints to Update a Spring Cache for a Spring Boot Application I used Spring Scheduler to execute a process on a regular basis to make separate async calls to several endpoints to keep the Spring cache updated and also as a health monitor. This serves two purposes for us, we monitor all the endpoints to ensure correct data is coming back and it keeps the caches fresh and up to date even when there hasn't been traffic on that endpoint recently. Guides on how to setup Spring caching: https://spring.io/guides/gs/caching/ http://codedevstuff.blogspot.com/2015/07/add-guava-cache-to-spring-boot-to-cache.html Guide on Spring Scheduler:   http://spring.io/guides/gs/scheduling-tasks/ View all the code used in this article on Github here: https://gist.github.com/anataliocs/61291ea9a96f8a642a61 The Spring Framework is maintained by Pivotal +Spring by Pivotal   Spring Scheduler You wil

Add Guava Cache to Spring Boot to Cache Method Calls

Image
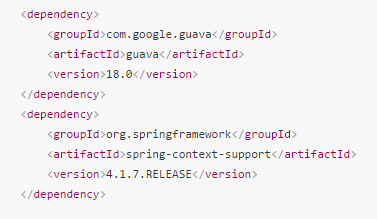
Add Google Guava Cache to Spring Boot to Cache the Results of Method Calls using Java Config and Spring Annotations If you have a time-intensive method that is slowing down your application and the results of that method don't change very often, it is a good candidate for caching.  This guide will show you how to implement caching in your Spring Boot application using Google Guava cache.   Guava cache is a simple, lightweight in-memory cache that has more configuration options then the default In-Memory Spring Cache.  Guava cache is not for clustered systems, for that you will want to use Hazelcast  http://hazelcast.com/ So if you just need a simple cache but you want more config options such as cache expiration time, then this approach may fit your use case.  Alternatively, you could use EhCache. Full source code references can be found at the bottom of the article. More info on Guava Cache: https://code.google.com/p/guava-libraries/wiki/CachesExplained Mo

Spring Boot Internationalization with Default Locale for Message Strings

Image
How to add Spring Boot Internationalization with Default Locale for Storing Message Strings such as Validation Messages in a message.properties file   This article will show you how to use a properties file to define static text in your application such as for validation message. All the code is appended at the bottom of the article.  You can also view all the code here: Link to Github Gist here Add Default locale and Message Source beans to your Application class   Add these classes to set your default locale and configure the location of your message properties file   Add locale and MessageSource beans to your Application Class Add a Service and Interface to retrieve message text   This service will pull the default locale from the session and then get the message text from your properties file using the messageSource. Add a service to get the msgs in your props file In your controller, use the Message service to get the message text   You

Change Port on a Spring Boot Application when using intelliJ

Image
Change Port on a Spring Boot Application when using intelliJ  Two ways to change the port that the embedded Tomcat is using in a Spring Boot Application. The first way is to modify the application properties in the resources folder: Update application props in Spring Boot Application There are a couple issues with this approach.  You might only want this port change in your local environment and if you check it in by accident you might break things. Alternatively, you can use a command line parameter. Go to Run -> Edit Configurations -> VM options Then enter in the following argument: -Dserver.port=8090 Then click apply and OK and attempt to run the application again. Update port using VM option

Convert Multiple Tasks to Sub-Tasks in JIRA similar to Bulk Update using Script Runner

Image
How to Convert A Large Number of JIRA Tasks into Sub-Tasks using the Adaptavist Script Runner Plugin with JIRA In JIRA, there is no way to convert Tasks into Sub-Tasks using the built-in Bulk Update functionality.  The lack of the feature is described in many JIRA tickets and Confluence posts on the official Atlassian site such as the two listed below: https://jira.atlassian.com/browse/JRA-13245 https://answers.atlassian.com/questions/37825/is-there-a-way-to-en-mass-convert-subtask-to-issues There are many potential workarounds to this such as using selenium scripting to automate the conversion process using browser automation.  The best solution I have found is to use scripting within JIRA. Backup your System Before you attempt this, you should backup your JIRA instance because you potentially can make changes to tasks you did not intend. Go to System settings and scroll down to the IMPORT & EXPORT section: Backup your JIRA instance

Tired Engineers: Welcome to the Future of Coffee Automation

Image
Welcome to the Future of Coffee Automation Introducing Brew().  A Coffee Automation system to initiate coffee brewing whenever your code quality starts to slip. Brew detects when you start writing crappy code, brews you some coffee, and empowers you to PUT DOWN THE KEYBOARD AND PICK UP THE MUG! The future of productivity for Software Engineers Brew() will save your life and the lives of your team.  Engineers depend on it. So what are you waiting for!?!?! Learn more about brew here:   Brew()

Add Stormpath User Mgmt Dependencies to Grails

Add Stormpath User Mgmt Dependencies to Grails How to add dependencies for Stormpath to your grails application. In your BuildConfig.groovy in the dependencies section you need to add 3 dependencies. These artifacts are up to date as of 2/2/2015 so you may need to look up the newest version here:   http://docs.stormpath.com/java/quickstart/ Here are the dependencies you need to add. BuildConfig.groovy dependencies { //Stormpath user mgmt compile 'com.stormpath.sdk:stormpath-sdk-api:1.0.RC3.1' runtime 'com.stormpath.sdk:stormpath-sdk-httpclient:1.0.RC3.1' runtime 'com.stormpath.sdk:stormpath-sdk-oauth:1.0.RC3.1' } Here are the original Maven imports in XML format for reference: < dependency > < groupId > com.stormpath.sdk </ groupId > < artifactId > stormpath-sdk-api </ artifactId > < version > 1.0.RC3.1 </ version > </ dependency > <